- TOPICS:
- HOMEWORK:
LINK Mid-Term Exam, Part 1 //
DUE Wednesday, February 28, 6:30pm (no later);
- REVIEW:We have worked with HTML Tables now for a couple weeks (almost three weeks now if you count since our last class), and we have dealt primarily how to create and manipulate our tables: what are the tags that go into making them, how to begin to set them up by row and then by cell, how to change the way they look with the border and background, and how to create larger cells both horizontally and vertically. In our last class, we continued with this exploration of tables by pushing further the complexity of the tables: we increased our investigation of two attributes for the <td> tag, rowspan and colspan. These attributes extend the ability of the <td> tag to become larger both horizontally and vertically, to take up the space of more than one cell, and perhaps to occupy the space of an entire row. This week, therefore, we learn no new HTML tags, but instead simply deepen our knowledge and understanding of what has already been covered. Next week we will look even further into the capabilities of HTML Tables. This way, hopefully, by spending four (4) entire classes on the subject of tables, you will begin to understand their importance in creating sophisticated designs for your web-pages. But first, let us review what we went over in previous classes on tables:
- Basic tags used in the creation of HTML tables: <html>, <table>, <title>, <tr> >, and <td>.
- Tables are created by the <table> tag, another example of a block level tag; however, as mentioned above, they are a special case, not only for what they can create in a web-page, but primarily for the many other varied tasks they may perform.
First and foremost, tables refer exactly to what the term suggests: they create tables for data, such as in accounting ledgers. By appearance, the table tag creates a grid of rectangular ‘cells’ where some kind of data or information is placed. These tables are organized by column (vertical divisions up and down the height of the page) and by row (horizontal divisions across the width of the page). They are built in HTML, however, one row at a time.
Here are a series of attributes that may be used with the <table> tag:
- width—changes the width of the table with units in pixels or as a percentage of the browser window.
- border—adds a border around the table and between the various rows and cells with a thickness of the designer’s choice with units in pixels. To be used sparingly as it tends to be over-used and used badly.
- bgcolor—the same attribute used in the <body> tag. In this case, it adds a background color only the area of the table itself. The particular color must be indicated in the hexadecimal color code.
- bordercolor—much like the bgcolor attribute in that it uses the hexadecimal color code, but in this case it only colors the borders.
- cellspacing—regulates the spacing between the various cells in the table.
- cellpadding—regulates the spacing around the edge against the border within each cell of the table.
- Table rows are created row-by-row using the <tr> tag, the table row tag. Each of these tags marks the beginning and ending of a single row in a table. For each row, one pair of these tags is necessary, one marking the start of the row, and one the end of it. Each row is composed of one or more cells.
- Table cells are the individual rectangles that make up the grid of the table. Each horizontal row consists of at least one rectangular cell where text or some kind of image may be placed. Typed between a pair of <tr> tags, each pair of <td> (for table data) tags creates one cell. For each additional cell, there must be another pair of <td> tags, and for each of these cells there must be some kind of content between the tags, or the cell will not register and therefore not appear in the browser window. This content may be in the form of an image, a link, some text, or even a blank space created by the series of characters, . Here are a series of attributes, which may be used with the <td> tag:
- width—changes the width of the cell and all of the cells below it in the same column with units in pixels or as a percentage of the table width.
- bgcolor—the same attribute used in the <body> tag. In this case, it adds a background color only the area of the table itself. The particular color must be indicated in the hexadecimal color code.
- align—sets the horizontal alignment for the content within the particular cell. There are three (3) possible values for this attribute: right, left, and center.
- valign—sets the vertical alignment for the content within the particular cell. Here, also, there are three (3) possible values: top, bottom, and middle.
- colspan—allows the particular cell to extend, or span, horizontally across more than one column of cells.
- rowspan—allows the particular cell to extend, or span, vertically downward across more than one row of cells.
- Table cells are the individual rectangles that make up the grid of the table. Each horizontal row consists of at least one rectangular cell where text or some kind of image may be placed. Typed between a pair of <tr> tags, each pair of <td> (for table data) tags creates one cell. For each additional cell, there must be another pair of <td> tags, and for each of these cells there must be some kind of content between the tags, or the cell will not register and therefore not appear in the browser window. This content may be in the form of an image, a link, some text, or even a blank space created by the series of characters, . Here are a series of attributes, which may be used with the <td> tag:
- INTRODUCE: In our last class we continued working with Tables in HTML, but focused on two attributes (rowspan and colspan) which go with the <td>tag to extend a cell downward or upward. Here is how it works:
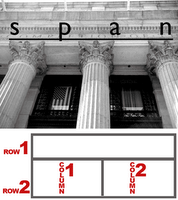 horizontal (side to side) arrays of table cells are considered rows, and vertical (up and down) arrays of cells are considered columns. And just as columns in buildings are also vertical, they support a horizontal beam which spans across several columns. Just look at the front of the NYC Post Office across the street. It has columns also.
- Colspan: In the picture above and to the right you can see that there are 3 columns which support the beam above them, where the word span is written. The table below this image is similar: there are two rows, one above the other, but the one on the top spans across the two columns in the row below. In HTML we would say that the big cell of the top row has a colspan of 2 because it spans the 2 columns below it.
In the table below, there are three (4) rows (horizontal divisions) and four (4) columns (vertical divisions):
Notice that the center row extends all the way across all four of the columns. This is because it has a greater colspan than the other cells of the table, <td colspan="4"> </td>. That one row, the one in the middle, only has one cell in the entire row. The other two rows, the one above and the one below, each have four (4) cells, and the code for this table looks like so: <table width="100%" border="1px" cellspacing="0px;" cellpadding="0px"> <tr> <td> </td> <td> </td> <td> </td> <td> </td> </tr> <tr> <td colspan="4"> </td> </tr> <tr> <td> </td> <td> </td> <td> </td> <td> </td> </tr> </table> If for whatever reason, you forgot that the second row gets only one cell, and instead put four (4) cells like all the other rows, your code would be like what follows--notice that row 2 has four cells like all the others, even though the first cell in that row has a rowspan of 4: <table width="100%" border="1px" cellspacing="0px;" cellpadding="0px"> <tr> <td> </td> <td> </td> <td> </td> <td> </td> </tr> <tr> <td colspan="4"> </td> <td> </td> <td> </td> <td> </td> </tr> <tr> <td> </td> <td> </td> <td> </td> <td> </td> </tr> </table> The previous code produces a table like the one below. Look how the second row has some extra cells hanging off the end:
All you need to do to solve that problem is simply delete those extra cells. In this case we have three extra cells hanging off the end, so we just need to delete those three in the second row and then it will look as it should. In the next example, we have a similar problem, but in the opposite direction: instead of extending a cell horizontally as we have in the previous example, we can also extend a cell vertically as we will see next. - Rowspan: In the following example, you will see another table; however, instead of a cell getting larger across the table, it gets larger down the table. This cell also has an increased span, but we call it rowspan instead of colspan. That is because the cell grows larger downward from one row to another. Remember, rows are like horizontal layers. In the following example, the first cell extends downward to the bottom of the table, so it spans more than one row. It therefore has an increased rowspan, a rowspan of 4:
The code for this table is as follows, you should take note that in this case, only the first row has four (4) cells. All of the other rows have only three cells. <table width="100%" border="1px" cellspacing="0px;" cellpadding="0px"> <tr> <td rowspan="4"> </td> <td> </td> <td> </td> <td> </td> </tr> <tr> <td> </td> <td> </td> <td> </td> </tr> <tr> <td> </td> <td> </td> <td> </td> </tr> <tr> <td> </td> <td> </td> <td> </td> </tr> </table> And that makes sense if we examine the table. The first cell of the table, the big one, starts in the upper-righthand corner. This is the first cell of the first row. All we did to make it bigger, to make it go from top to bottom of the table, was use the rowspan attribute. If we took that out, then we see that we're missing a cell in each of the other rows. What happens, then, when we increase the rowspan is that the cell pushes downward, moving all the cells below it to the right. If we had forgotten to remove one of the cells in rows 2, 3, and 4, then we would have the table as follows:
The code for this mistake is below: <table width="100%" border="1px" cellspacing="0px;" cellpadding="0px"> <tr> <td rowspan="4"> </td> <td> </td> <td> </td> <td> </td> </tr> <tr> <td> </td> <td> </td> <td> </td> <td> </td> </tr> <tr> <td> </td> <td> </td> <td> </td> <td> </td> </tr> <tr> <td> </td> <td> </td> <td> </td> <td> </td> </tr> </table> Like the colspan example, this can be remedied simply by removing one cell from rows 2, 3, and 4. - Colspan & Rowspan:These two attributes may also be used together instead of just one or the other. This way, a table cell can be expanded both horizontally and vertically, both across the table and down the table. The table below is an example of this:
and below is the code for such a table: <table width="100%" border="1px" cellspacing="0px;" cellpadding="0px"> <tr> <td> </td> <td> </td> <td> </td> <td> </td> </tr> <tr> <td> </td> <td colspan="2" rowspan="2"> </td> <td> </td> </tr> <tr> <td> </td> <td> </td> </tr> <tr> <td> </td> <td> </td> <td> </td> <td> </td> </tr> </table> Notice above, that there are only three (3) cells in row 2, and only two (2) cells in row 3. Row 2 is the row that contains the cell with the rowspan and colspan attributes. If it, and the row below it, row 3, had the same number of cells as the other two rows, rows 1 and 4, here is what the table would look like:
Notice here that this time there are three extra cells, one in the second row, and two in the third row. As for the other examples, the solution to this mistake is simply to delete the extra cells. Here is the code for the previous table with the unnecessary cells shown in red: <table width="100%" border="1px" cellspacing="0px;" cellpadding="0px"> <tr> <td> </td> <td> </td> <td> </td> <td> </td> </tr> <tr> <td> </td> <td colspan="2" rowspan="2"> </td> <td> </td> <td> </td> </tr> <tr> <td> </td> <td> </td> <td> </td> <td> </td> </tr> <tr> <td> </td> <td> </td> <td> </td> <td> </td> </tr> </table> - Complex usage of Colspan & Rowspan:As mentioned previously, tables in web-pages and web-sites are ubiquitous, they are everywhere. In most cases these tables are used invisibly, with the borders set to zero, as layout devices. Many times, therefore, it can be quite difficult to discern exactly what is the structure of the tables at work in a particular design or layout. This skill, however, deciphering the code of already existing sites, understanding the tables of sites already publish, is a valuable one especially given the reality that much work in web-design is work with templates and work on maintenance. It is important to learn how to figure out a table so that it may be revised, or edited, or so that it may be improved or adapted to new uses. Below here, then, is an example from class of a complex use of colspan and rowspan in a table:
<table width="100%" border="1px" cellspacing="0px;" cellpadding="0px"> <tr> <td> </td> <td> </td> <td> </td> <td> </td> <td> </td> <td> </td> <td> </td> </tr> <tr> <td> </td> <td> </td> <td colspan="2"> </td> </tr> <tr> <td> </td> <td rowspan="5"> </td> <td> </td> <td colspan="4"> </td> </tr> <tr> <td> </td> <td rowspan="4"> </td> <td> </td> <td colspan="3"> </td> </tr> <tr> <td> </td> <td rowspan="3"> </td> <td> </td> <td colspan="2"> </td> </tr> <tr> <td> </td> <td rowspan="2"> </td> <td rowspan="2" colspan="2"> </td> </tr> <tr> <td> </td> </tr> </table> A pattern in the code for such a table is less evident perhaps than the other previous examples given; however, note that there the first row has seven cells, and that the last row only has one cell. Because of this, I will break down the table and just do a little at a time. We will begin with rowspan, investigating how it has been achieved, and then move on to colspan afterwards. Prior to that and just as a point of comparison, below I show the original table of 7 rows with 7 cells per row to show how the increased rowspan and colspan affects it, the unnecessary cells in red:- The next table shows the first step, the original table with just the rowspan added:
<table width="100%" border="1px" cellspacing="0px;" cellpadding="0px"> <tr> <td> </td> <td> </td> <td> </td> <td> </td> <td> </td> <td> </td> <td> </td> </tr> <tr> <td> </td> <td> </td> <td> </td> <td> </td> <td> </td> <td> </td> <td> </td> </tr> <tr> <td> </td> <td rowspan="5"> </td> <td> </td> <td colspan="4"> </td> </tr> <tr> <td> </td> <td> </td> <td rowspan="4"> </td> <td> </td> <td> </td> <td> </td> <td> </td> </tr> <tr> <td> </td> <td> </td> <td> </td> <td rowspan="3"> </td> <td> </td> <td> </td> <td> </td> </tr> <tr> <td> </td> <td> </td> <td> </td> <td> </td> <td rowspan="2"> </td> <td rowspan="2"> </td> <td> </td> </tr> <tr> <td> </td> <td> </td> <td> </td> <td> </td> <td> </td> <td> </td> <td> </td> </tr> </table> - Above here, it is interesting that the unnecessary cells are not hanging off the end of the rows, but are nestled in between the enlarged cells, which makes the selection of which cells to eliminate particularly difficult. In fact, unlike previous examples, the last cells of each row are to be retained and not eliminated. See below the table with the unecessary cells removed:
- The next step is to add in the colspan to the cells we wish to expand across the cells. We will do this first, however, before we remove any unnecessary cells:
<table width="100%" border="1px" cellspacing="0px;" cellpadding="0px"> <tr> <td> </td> <td> </td> <td> </td> <td> </td> <td> </td> <td> </td> <td> </td> </tr> <tr> <td> </td> <td> </td> <td colspan="5"> </td> <td> </td> <td> </td> <td> </td> <td> </td> </tr> <tr> <td> </td> <td rowspan="5"> </td> <td> </td> <td colspan="4"> </td> <td> </td> <td> </td> <td> </td> </tr> <tr> <td> </td> <td rowspan="4"> </td> <td> </td> <td> </td> <td colspan="3"> </td> <td> </td> </tr> <tr> <td> </td> <td rowspan="3"> </td> <td> </td> <td> </td> <td colspan="2"> </td> </tr> <tr> <td> </td> <td rowspan="2"> </td> <td rowspan="2" colspan="2"> </td> <td> </td> </tr> <tr> <td> </td> <td> </td> </tr> </table>- As you can see, things are coming along quite well. We simply have to remove the unnecessary cells in red. Once done, we get the table and code below, the same as what we saw in the beginning of this exercise: <table width="100%" border="1px" cellspacing="0px;" cellpadding="0px"> <tr> <td> </td> <td> </td> <td> </td> <td> </td> <td> </td> <td> </td> <td> </td> </tr> <tr> <td> </td> <td> </td> <td colspan="5"> </td> </tr> <tr> <td> </td> <td rowspan="5"> </td> <td> </td> <td colspan="4"> </td> </tr> <tr> <td> </td> <td rowspan="4"> </td> <td> </td> <td colspan="3"> </td> </tr> <tr> <td> </td> <td rowspan="3"> </td> <td> </td> <td colspan="2"> </td> </tr> <tr> <td> </td> <td rowspan="2"> </td> <td rowspan="2" colspan="2"> </td> </tr> <tr> <td> </td> </tr> </table>
- The next step is to add in the colspan to the cells we wish to expand across the cells. We will do this first, however, before we remove any unnecessary cells:
- The next table shows the first step, the original table with just the rowspan added:
- REVIEW:We have worked with HTML Tables now for a couple weeks (almost three weeks now if you count since our last class), and we have dealt primarily how to create and manipulate our tables: what are the tags that go into making them, how to begin to set them up by row and then by cell, how to change the way they look with the border and background, and how to create larger cells both horizontally and vertically. In our last class, we continued with this exploration of tables by pushing further the complexity of the tables: we increased our investigation of two attributes for the <td> tag, rowspan and colspan. These attributes extend the ability of the <td> tag to become larger both horizontally and vertically, to take up the space of more than one cell, and perhaps to occupy the space of an entire row. This week, therefore, we learn no new HTML tags, but instead simply deepen our knowledge and understanding of what has already been covered. Next week we will look even further into the capabilities of HTML Tables. This way, hopefully, by spending four (4) entire classes on the subject of tables, you will begin to understand their importance in creating sophisticated designs for your web-pages. But first, let us review what we went over in previous classes on tables:
Saturday, February 24, 2007
Spring 2007
week 5: 02/21
Hi everybody, I tried to get this done by yesterday, but I just couldn't seem to find the time to complete it. But here it is now for you. Below, you will see I go into even greater detail on creating tables than I did in class. Please make sure you understand how colspan and rowspan function in a table.
Please, also take notice that I have assigned the Mid-Term Exam this week. It is a take-home test, so please download the test and follow instructions. I will not accept late exams.
Thursday, February 15, 2007
Spring 2007
week 4: 02/14
Well hello everybody. I'm sorry I missed you last night, but I'm sure we were all better off not being out in the terrible weather. Nonetheless, for those of you intelligent enough to check this blog, you will find that the show (aka the class and blog) must go on.
Below, you will find what I would have covered this week. You will see that much of what is below, I've already mentioned in class before. Therefore, most shouldn't be entirely new. We've already experimented a little with tables and we have already created a web-site with more than one page. This week's class was supposed to be a bit of a review and a way to solidify what was already given before we move into the mid-term phase of the class. Because of this, you who have visited the blog this week will know that I am going to give you a quiz during the next class. You will find a link here later on today, or tomorrow that will outline exactly what the quiz will cover.
In addition, the homework that I would have looked at last night will be due next week along with the homework that you will find below. At the beginning of our next class, then, you will show me homework for week 3 and week 4.
Please remember that Monday there are no classes held at TCI as a result of President's Day. Instead, Thursday of next week will have a Monday's schedule. Do not go to your Thursday classes next week. Obviously, this has nothing to do with our class, but I just wanted to remind you.
- TOPICS:
- XHTML DTD (Document Type Definition),
- More with Images—Images as Links,
- Multiple Page Web-Sites,
- HTML Tables.
- HOMEWORK:
- QUESTIONS: Here are some questions to help guide you through this weeks' material:
- Define: block tags, in-line tags and empty tags? How are they similar or different from each other?
- What are some examples of each type?
- What must be done in order to make an image into a hyperlink?
- What are the three tag pairs necessary to create a table?
- Between what two table tags must content be typed?
- What are ALL the sorts of content which may be placed within a table?
- Can an image in a table be made into a link? If not, then why not? If so, then how?
- REVIEW: up to now, during these first three (3) weeks of class, you have been introduced to the three basic types of HTML Tags (Block tags, In-line tags, and Empty tags) and their primary purposes and basic functions in creating a web-page. Therefore, the first three weeks are intended as a kind of introduction to the structure and mechanics of HTML.
However, from this point on, we will increasingly explore the use of these tags, and others, in more sophisticated, nuanced, and complex situations. As a result, design, and not merely function, will play a larger role and become increasingly important to help solve problems.
- Basic tags used in the creation of web-pages: <html>, <head>, <title>, and, in most types of HTML and XHTML documents, <body>.
- Block tags covered up to this point in class: <h1>, <h2>, <h3>, <h4>, <h5>, <h6>, <p>, <ol>, and, <ul>.
- In-Line tags covered up to this point in class: <b>, <i>, <u>, <a>, and, <font>.
- Empty tags covered up to this point in class: <br/>, <hr/>, and, <img/>.
- INTRODUCE:Over the last few classes we have seen the introduction of the issue of Tables in HTML. Tables are an especially important and, at times, complex issue with regard to web-design. We will, therefore, spend several classes exploring the various roles tables can fulfill.
In addition, during the second half of the semester, we will explore two (2) case-studies, two examples of two different types of web-pages that will serve as practical demonstrations of how tables may be employed to solve page-layout issues.
But before we resume with tables, Let's consider images a bit more. As has already been covered in previous classes, to insert an image into a web-page, the <img/> tag must be present together with the src attribute indicating the particular file source for the image as follows:
— <img src="lily.jpg"/> —
 It is an empty tag, so the slash is found just before the closing bracket. In addition, we have also learned how to create links, using the anchor <a> tag, along with the href attribute to indicate the web address to another web-page or web-site:
<a href="http://dma101.blogspot.com">
DMA101 Blog </a>
the previous code leads to this link which is just to another blog-site: DMA101 Blog. These two things, the image and the link, may be put together, however, in which an image is used as a link instead of text. To do this, the text DMA101 Blog may be replaced with the image, with the first anchor tag before, and the closing anchor tag after, such as:
<a href="http://dma101.blogspot.com">
<img src="lily.jpg"/>
</a>
This creates the above image as a link to the blog site for another class. In the examples above, the text link and the image made into a link, both link to an external site, that is, a web-site unrelated to the current page. If it is not part of the current site, then you must type the entire url, protocol (http://) and all; however, if the link is to another page in the same web-site, and if the page is located in the same folder, then all you need do is type the name of the file as the reference. These are known as relative references and are used for internal links within a single site.
And finally, we come to HTML tables:
It is an empty tag, so the slash is found just before the closing bracket. In addition, we have also learned how to create links, using the anchor <a> tag, along with the href attribute to indicate the web address to another web-page or web-site:
<a href="http://dma101.blogspot.com">
DMA101 Blog </a>
the previous code leads to this link which is just to another blog-site: DMA101 Blog. These two things, the image and the link, may be put together, however, in which an image is used as a link instead of text. To do this, the text DMA101 Blog may be replaced with the image, with the first anchor tag before, and the closing anchor tag after, such as:
<a href="http://dma101.blogspot.com">
<img src="lily.jpg"/>
</a>
This creates the above image as a link to the blog site for another class. In the examples above, the text link and the image made into a link, both link to an external site, that is, a web-site unrelated to the current page. If it is not part of the current site, then you must type the entire url, protocol (http://) and all; however, if the link is to another page in the same web-site, and if the page is located in the same folder, then all you need do is type the name of the file as the reference. These are known as relative references and are used for internal links within a single site.
And finally, we come to HTML tables:
- Tables are created by the <table> tag, another example of a block level tag; however, as mentioned above, they are a special case, not only for what they can create in a web-page, but primarily for the many other varied tasks they may perform.
First and foremost, tables refer exactly to what the term suggests: they create tables for data, such as in accounting ledgers. By appearance, the table tag creates a grid of rectangular ‘cells’ where some kind of data or information is placed. These tables are organized by column (vertical divisions up and down the height of the page) and by row (horizontal divisions across the width of the page). They are built in HTML, however, one row at a time.
Here are a series of attributes that may be used with the <table> tag:
- width—changes the width of the table with units in pixels or as a percentage of the browser window.
- border—adds a border around the table and between the various rows and cells with a thickness of the designer’s choice with units in pixels. To be used sparingly as it tends to be over-used and used badly.
- bgcolor—the same attribute used in the <body> tag. In this case, it adds a background color only the area of the table itself. The particular color must be indicated in the hexadecimal color code.
- bordercolor—much like the bgcolor attribute in that it uses the hexadecimal color code, but in this case it only colors the borders.
- cellspacing—regulates the spacing between the various cells in the table.
- cellpadding—regulates the spacing around the edge against the border within each cell of the table.
- Table rows are created row-by-row using the <tr> tag, the table row tag. Each of these tags marks the beginning and ending of a single row in a table. For each row, one pair of these tags is necessary, one marking the start of the row, and one the end of it. Each row is composed of one or more cells.
- Table cells are the individual rectangles that make up the grid of the table. Each horizontal row consists of at least one rectangular cell where text or some kind of image may be placed. Typed between a pair of <tr> tags, each pair of <td> (for table data) tags creates one cell. For each additional cell, there must be another pair of <td> tags, and for each of these cells there must be some kind of content between the tags, or the cell will not register and therefore not appear in the browser window. This content may be in the form of an image, a link, some text, or even a blank space created by the series of characters, . Here are a series of attributes, which may be used with the <td> tag:
- width—changes the width of the cell and all of the cells below it in the same column with units in pixels or as a percentage of the table width.
- bgcolor—the same attribute used in the <body> tag. In this case, it adds a background color only the area of the table itself. The particular color must be indicated in the hexadecimal color code.
- align—sets the horizontal alignment for the content within the particular cell. There are three (3) possible values for this attribute: right, left, and center.
- valign—sets the vertical alignment for the content within the particular cell. Here, also, there are three (3) possible values: top, bottom, and middle.
- colspan—allows the particular cell to extend, or span, horizontally across more than one column of cells.
- rowspan—allows the particular cell to extend, or span, vertically downward across more than one row of cells.
- Table cells are the individual rectangles that make up the grid of the table. Each horizontal row consists of at least one rectangular cell where text or some kind of image may be placed. Typed between a pair of <tr> tags, each pair of <td> (for table data) tags creates one cell. For each additional cell, there must be another pair of <td> tags, and for each of these cells there must be some kind of content between the tags, or the cell will not register and therefore not appear in the browser window. This content may be in the form of an image, a link, some text, or even a blank space created by the series of characters, . Here are a series of attributes, which may be used with the <td> tag:
- Tables are created by the <table> tag, another example of a block level tag; however, as mentioned above, they are a special case, not only for what they can create in a web-page, but primarily for the many other varied tasks they may perform.
First and foremost, tables refer exactly to what the term suggests: they create tables for data, such as in accounting ledgers. By appearance, the table tag creates a grid of rectangular ‘cells’ where some kind of data or information is placed. These tables are organized by column (vertical divisions up and down the height of the page) and by row (horizontal divisions across the width of the page). They are built in HTML, however, one row at a time.
Here are a series of attributes that may be used with the <table> tag:

Saturday, February 10, 2007
Spring 2007
week 3: 02/07
Hi everybody, Please forgive me for taking so long to pubish this week's blog posting. Some weeks I just have so much to do other than posting this blog that it is difficult to fit time in to write this thing up. In addition, some weeks I just have so much to say on this blog, so much to cover that I never seem to be able to complete it. This week was one of those weeks.
I have been working with the rest of the DMA faculty on proposals to create new majors and expand our curricula, seek out new directions for us and for our students. So, if any of you have ideas of topics that you wish to study, or that you think TCI should cover, majors that we should offer, then please let me know. This school tends to listen to the students. You have a much larger voice than you might realize. All you have to do is speak up. You are the ones who are actually paying the bills around here anyway, right?
Now, back to this class. In this week's blog, I wanted to cover quite a few things, everything that I went over in class of course; and, in addition, quite a lot that I did not cover. Whatever you read in this week's blog, however, that I did not cover in class, I will cover in the next class. I'm speaking mainly of course of what you will find below about lists. What I covered about images in our class last Wednesday (the 3rd week), I usually do in the 4th week, and what I normally cover on html lists in the 3rd week, this term I'll be covering next week (the 4th week). In other words, I just switched weeks 4 and 5 because it felt like it would flow a lot better since I had already introduced images the previous week. HTML lists is a relatively easy, short, and minor concept compared to images and tables, so we will not spend much time on them.
The first 3 links below are for those lists, and the last 4 have to do with what we covered in class, resizing images with PhotoShop, inserting images into the page, and then putting them into a table.
- TOPICS:
- HOMEWORK: LINK Download this week's homework here:
- QUESTIONS: Here are some questions to help guide you through this weeks' material:
- What are the three (3) types of lists?
- What is the difference between an Ordered List and Unordered List?
- What are four types of Ordered Lists?
- What are three types of Unordered Lists?
- What are the two main tags for Definition lists?
- What attribute must be used with the <img/> in order to place an image into a web page?
- What are the three tag pairs necessary to create a table?
- Between what two table tags must content be typed?
- What are ALL the sorts of content which may be placed within a table?
- INTRODUCE:
- Lists: HTML Lists are used to organize and present categories of information to your readers one point at a time; however, because there many ways to present information, there are a few types of lists to choose from. The code for creating an HTML list, when read by the browser, the will automatically create a list formatted depending on which type is chosen.
- Ordered Lists are particular types of lists in which the elements that make up the list must be in a particular order. This order may be numbered or lettered, but whatever the case, the order that the items come is important. To create an ordered list you must use the <ol> tag. To specify a kind of list, you must use the type attribute, and give it a value of 1 for a numbered list, A for a lettered list with upper case letters, a for a lettered list with lower case letters, i for a numbered list using lower case Roman Numerals, and I for a numbered list using upper case Roman Numerals. If you wish to start the list with a different number or letter, in addition to the type attribute, you must use the start attribute, and then its value will be whatever number or letter you wish to start. The heading of the list is indicated by a pair of tags, <lh>list heading</lh>, with the heading typed in between them; and, likewise, each item in the list itself is indicated by a pair of tags, <li>list item</li>, with the text for that item in between them.
- Unordered Lists are particular types of lists in which the elements that make up the list are NOT in a particular order. This is a bulleted list organized like a shopping list in which the items listed are randomly placed, indicated by a graphic symbol known as a bullet. To create an unordered list you must use the <ul> tag. To specify the kind of bullet graphic, you must use the type attribute here as well, and give it a value of circle, disk, or square. The heading of the list, is indicated by a pair of tags, <lh>list heading</lh>, with the heading typed in between them; and, likewise, each item in the list itself is indicated by a pair of tags, <li>list item</li>, with the text for that item in between them.
- Definition Lists are particular types of lists in which the elements that make it up are terms and their definitions. To create a definition list you must use the <dl> tag. The term to be defined is indicated with a pair of tags,<dt>definition term</dt>, and the definition of that term is noted by another pair of tags, <dd> the definition of the term</dd>.
- Image Editing & Preparation—Before Images may be inserted into a web-page, they always have to be prepared. This has to do with resizing, cropping or any sort of color correction. The most widely used software application for image editing & preparation is Adobe PhotoShop. Once an image has been prepared, then it is ready for insertion into the page along with all of the other content. The most common operation performed on images is resizing them down to fit properly within a page-layout and design. The following steps outline a simple resizing process for a single image intended for a web-page.
- Open the image with PhotoShop.
- Select: Image >> Image Size Then, in the dialog box that opens up, select an appropriate width or height. For images intended for web-pages, the resolution should always be 72ppi. Click okay.
- Save the image with its new dimensions. If you aren't certain, save it with a new name so that you will still have the original if you must go back and change it again.
- Inserting Images: The subject of images is somewhat more complicated that most of the rest of HTML, and four (4) things must be kept in mind:
- To place an image inside a web-page, one must use a different kind of tag, an empty tag. As mentioned last week, an empty tag does not come in pairs that surround some text or content that it formats or modifies. Instead, they are singular tags that create the content itself.
- On its own, the <img/> tag does nothing, so it must be accompanied by a particular attribute which has the task of noting to the browser which image file will be placed in the web-page. This is the src attribute, the source attribute. Following this attribute, you must type the file/folder path of the particular image you wish to place in the web page as its value.
- In order for this image to display in the browser, the files in your folder for this web-page must be well-organized and well placed. Here I will make a note of the importance of file organization to the creation of web-pages. I will start with the example of this particular file I am typing now, this week’s class notes. I typed this document on my computer in my office and I saved it on my hard disk, the C: drive. Inside my C: drive, I have a folder named classes. Inside of that folder I have another folder named spring07 (I have a different folder for each semester). Inside that folder, I have yet another folder named dma110 (once again, I have a different folder for each of the classes I teach); and finally, inside that folder I have a series of folders named by week—week1, week2, week3, etc. up to week14. As this is the third week of class, I saved this document in the week3 folder, and I named it dma110wk3.doc . The folder hierarchy looks like this— C://classes/spring06/dma110/week2/dma110wk3.doc I go through explaining all of that because it addresses the issue of hierarchy. This is known as a folder hierarchy. The most important folder comes first as every-thing else is found inside that folder. In my case, all of my files for all of my classes for all of the terms I’ve taught here are located in my classes folder. Likewise, when you create a new webpage, it is important to create a separate folder for that web-page. You should then save your HTML document inside that folder. This will be the main folder for the new HTML project. Also inside this main folder should be a series of other folders, a folder for each type of content, for example. One folder for your images probably, another for flash files perhaps, yet another for CSS, and still another possibly for sound/music files. If you are not organized, your web-page will likely not appear properly in the browser when you view it. Some images may not show up, you might duplicate some files accidentally, or some other mistake if everything is not in its proper place.
- There are attributes which may be used with the <img/> tag:
- src—a required attribute which indicates to the browser which image file is to be displayed in the web-page. The location of the file, followed by the filename, and then the file extension must be typed;
- alt—another required attribute but one which displays a small box over the image with some text that you type for the value of the attribute. This is alternative text that will be displayed in the case the image does not show up, or whenever you mouse over the image with your cursor;
- width—changes the width of the image in the web-page without changing the actual number of pixels in the image file itself. This attribute is meant primarily to make only minute changes in the width either down or up. For large changes, an image editor, such as PhotoShop, should be used;
- height—changes the height of the image in the web-page without changing the actual number of pixels in the image file itself. This attribute is meant primarily to make only minute changes in the height either down or up. For large changes, an image editor, such as PhotoShop, should be used;
- border—adds a border around the image with a thickness of the designer’s choice. To be used sparingly as it tends to be over-used and used badly.
- Below is an example of an <img/> tag used with an src attribute: <img src="images/myPicture.jpg"/> In the above code, the first term after the src attribute is the location of the image. In this case, it is in the images folder. Following that we have the name of the file and its file extension, myPicture.jpg . The location of your images is within their own folder. This folder is ALWAYS within the main folder of the web-page. You should never place it outside the main folder of your web-page as this will cause your images to fail to load in the browser window.
- Tables—To create a table in HTML, the first tag pair required is the <table></table> tag pair. These two tags mark the beginning and the ending of the table respectively.
- Table Rows—Alone, the <table></table> tag pair does very little. Tables are constructed row by row to form horizontal bars, one at a time. To create a single row, the<tr></tr> tag pair must be placed between the <table> tags. If more than one row is desired, then more than one pair of <tr> tags must be typed.
- Table Cells—Likewise, the <tr></tr> tag pair does very little on its own. As mentioned, tables are constructed row by row to form horizontal bars, which are created by typing a <tr></tr> tag pair for each row desired. Furthermore, these rows are made up of smaller rectangular divisions, known as cells, where data is to by typed. There must be at least one cell within each row. To create a cell, the <td></td> tag pair must be placed between the<tr> tags. <td> here stands for Table Data. If more than one cell is desired, then more than one pair of <td> tags must be typed.
- Content—In order for there to be a table visible in the page at all, some content must be place between the <td></td> tag pair. This content may be in the form of text, links, images, or even other tables. If no content is desired, if the cell should appear empty, then the content must be invisible. To accomplish this, you must type a "blank space" between the <td> tags. To type a SINGLE blank space in a page of HTML, you must type the following string of characters Observe the following example:
<table>
<tr>
<td> </td>
</tr>
</table>
In the above example, there is one pair of <table> tags at the beginning and ending to mark the extents of the table. Inside of those tags, there is one pair of <tr> tags that will create one single row in this table. Then, finally, between those two tags, there is a single pair of <td> tags that will create a single cell within that row. This means that the table consists of a single row with one single cell. What we will see as a result of this table, then, is a little box. To create a table with three rows, you will have to type three pairs of <td> tags, as in the example below:
<table border="1px">
<tr>
1 <td> </td>
2 <td> </td>
3 <td> </td>
</tr>
</table>
The above code will create the table below:
Although it appears as if there is no content in the cells of the table above, the computer or the browser considers this to be false. There is content, albeit invisible content. There is a blank space inside of each cell created by the characters . There may be, however, other types of content besides characters, whether visible or invisible. Images may also be used as the content within a table. To place an image within a table, you must put the <img/> tag between the <td></td> tags. For example: <table border="1px"> <tr> <td> </td> <td><img src="images/myPicture.jpg"/></td> <td> </td> </tr> </table> This code might result in the stunning image inside the table below:
- Lists: HTML Lists are used to organize and present categories of information to your readers one point at a time; however, because there many ways to present information, there are a few types of lists to choose from. The code for creating an HTML list, when read by the browser, the will automatically create a list formatted depending on which type is chosen.

Saturday, February 03, 2007
Spring 2007
week 2: 01/31
Hello everyone,
I'm sorry that this week's posting took a little longer than I had expected it to take. I think next week that it should be a little bit faster, and it shouldn't take me until the weekend again to do the posting.
During this past week's class we did a great many things, and I introduced many different things to you. Some of them I will cover in more detail now than others. Not that the others are less important, but I will wait until another week to consider them in more detail. I do not wish to overwelm you with too many details too fast. In any case, you guys seem to be handling this material exceptionally well. I am impressed, and hope to see great things out of this class.
I'll see you in class on Wednesday. Below, you will find homework due the coming week.
- TOPICS: You will be quizzed over this week's and last week's material next week.
- HOMEWORK: LINK Download this week's homework here:
- QUESTIONS: Here are some questions to help guide you through this weeks' material:
- What does the abbreviation XHTML stand for?
- What is XML?
- What is the difference between XHTML and conventional HTML?
- What are some of the standards that should guide the typing of strict XHTML?
- What does CSS stand for? What is it used for?
- What is the difference between XHTML and CSS?
- What is an empty tag? What are some examples of empty tags?
- What attribute must be used with the <img/> in order to place an image into a web page?
- INTRODUCE:
- XHTML: is an abbreviation for eXtensible HyperText Markup Language, and is not a separate language from HTML. Instead, it is a variation, much like the difference between the language that you use to write an essay for your English class and street slang. The primary differences is that it has stricter standards than conventional HTML. It is actually an attempt to marry the standards for XML (eXtensible Markup Language) to the purpose of HTML, creating web pages.
XML is a cross-platform markup language, used primarily for organizing the information in databases. However, since some devices (such as wireless devices) cannot run web-browsers to display the data and information of databases stored on servers, conventional web-pages (created with HTML) may not be displayed on them. HTML is the markup language used specifically for web browsers on ordinary laptop and desktop computers, not for smaller handheld devices.
XML has very rigid standards of construction and organization. Therefore, as a way to merge the two mark-up languages, and as a way to prepare for the day when all browsing will be done with XML (so as to make all web-pages cross-platform), stricter standards were created for HTML. Thus the formation of XHTML.
As the standards had been, HTML standards are actually quite loose and forgiving. It is possible to make many mistakes and even leave out some tags when typing HTML and still have the web-browser translate the code and present it correctly. This is unreliable, however, as the composer of the code never knows what might come out as a result of the mistakes. Fortunately, web-browsers can decode both HTML and XHTML equally as if there were no difference between them. XHTML, comparatively, has much more rigid standards, and those are the standards that we will use for the creation of our web-pages in this class:
- All tags and their attributes must be typed in lower case;
- Quotation marks must surround the values for all attributes;
- Units must be supplied for all attribute values where necessary;
- All tags must be closed and typed in pairs—except in the case of open tags such as <img/> and <br/>
- All empty tags must be typed in the XHTML format with the closing slash before the second angle bracket;
- Some conventional HTML inline tags are deprecated. This means that these tags are not considered a legitimate part of the language and are not to be used if strict standards are being followed. The primary reason for this is that CSS is preferred and can perform all of the same functions more efficiently and with greater flexibility
- A doctype (DTD) indicator must be present at the start of the document. For this reason, if you make mistakes when typing XHTML, the browser will likely not register them, and your page will still be rendered properly. Nonetheless, you would still not be typing XHTML (just standard HTML), and your code would not be able to undergo any scrutiny by an XHTML code validator (see: http://validator.w3.org).
- CSS: otherwise known as Cascading Style Sheets, is not a programming language, and neither is it a mark-up language (as is HTML). It is a series of formatting indications made to a web-browser. When the browser reads these specifications, it carries them out on a particular web-page or set of web-pages. For this reason, the tags—primarily some of the in-line tags—that have mostly to do with formatting, are considered deprecated. This means that they will eventually be eliminated and no then longer considered part of the code. Some of these deprecated tags are <b>, <i>, <u>, and <font>. CSS is a much more efficient way to accomplish the tasks that these tags once did, as most of the styling is centralized in a couple of locations, either in the head of a document or in a separate document altogether devoted solely to CSS, instead of being dispersed throughout the various bodies of documents. Moreover, much more styling and formatting can be accomplished with CSS than standard HTML was ever capable of. code tasks: XHTML—organization and structure of data in a web page. CSS—presentation and aesthetics of the data in a web page.
- Empty Tags: Last week there were two types of tags mentioned, block tags, and inline tags. To review, the task of block tags is to organize information into categories. There are seven categories, six levels for headings tags and then for ordinary paragraph text. These seven categories serve to set off text into distinct blocks according to how important it is.
Inline tags make up the other set of HTML tag. As noted, they serve primarily for presentation rather than organization, and therefore are concerned about the look of the text. So, whereas the block tags create blocks, the in-line tags distinguish text within these blocks with various colors, typefaces, sizes and other factors that modify appearance.
There is a third set of tags, however, known as empty tags. These tags are called empty because they do not format content. All other tags surround text or other content: one tag goes in front of the content (or text) and the second tag goes at the end, where one marks the beginning and the other marks the end. Empty tags do not operate in this way. They do not surround content because they do not come in pairs. They are singular tags and as a result are considered empty. Furthermore, they do not surround content but rather generate it, or create it. One empty tag creates a vertical blank space in a web-page, another draws a horizontal line, while yet another creates an image.
- The<br/> tag is one example of an empty tag, and it also known as the break tag . It creates a specific kind of content. It does not create text characters, but rather it creates a blank character, also known as a breaking space. It is called a breaking space because it breaks the line and starts anything that follows back at the margin on the next line. Many of these tags may be used together to create multiple breaking spaces, or to push content further down.
- The<hr/> tag is another example of an empty tag, otherwise known as the hard rule tag . It creates a specific kind of content, not text nor spaces, but a horizontal line across the page. This tag may be modified by three attributes:
- size which alters the thickness of the line;
- width which sets the distance of the line extending across the web-page; and
- color which, obviously, changes the color of the line. Like the bgcolor attribute for the <body> tag, and the color attribute for the <font> tag, the color is set using the Hexadecimal Color Code.
- The<img/> tag is the third example of an empty tag (there are still others), otherwise known as the image tag. It creates a specific kind of content, not text, spaces, or lines, but an image. However, alone this tag does nothing other than indicate to the browser where the image should go (before some bit of text and after some other bit of text, for example). It does not tell the browser which image to put there. In order to do that, an attribute must be used that indicates which image file from your set of folders is to be drawn into the web-page. This attribute is the src attribute, or source attribute. For the value of this attribute, you must type three (3) things:
- the location of the file (usually the images folder within the main folder;
- the name of the file (typed without spaces); and, followed by
- the 3 or 4-letter file extension .
- XHTML: is an abbreviation for eXtensible HyperText Markup Language, and is not a separate language from HTML. Instead, it is a variation, much like the difference between the language that you use to write an essay for your English class and street slang. The primary differences is that it has stricter standards than conventional HTML. It is actually an attempt to marry the standards for XML (eXtensible Markup Language) to the purpose of HTML, creating web pages.
XML is a cross-platform markup language, used primarily for organizing the information in databases. However, since some devices (such as wireless devices) cannot run web-browsers to display the data and information of databases stored on servers, conventional web-pages (created with HTML) may not be displayed on them. HTML is the markup language used specifically for web browsers on ordinary laptop and desktop computers, not for smaller handheld devices.
XML has very rigid standards of construction and organization. Therefore, as a way to merge the two mark-up languages, and as a way to prepare for the day when all browsing will be done with XML (so as to make all web-pages cross-platform), stricter standards were created for HTML. Thus the formation of XHTML.
As the standards had been, HTML standards are actually quite loose and forgiving. It is possible to make many mistakes and even leave out some tags when typing HTML and still have the web-browser translate the code and present it correctly. This is unreliable, however, as the composer of the code never knows what might come out as a result of the mistakes. Fortunately, web-browsers can decode both HTML and XHTML equally as if there were no difference between them. XHTML, comparatively, has much more rigid standards, and those are the standards that we will use for the creation of our web-pages in this class:
Subscribe to:
Posts (Atom)